Installation
Steps(MUST BE IN WINDOWES XP)
Step 1.
Download XAMPP 1.7.2 from http://www.filehorse.com/download-xampp/10214/
and install it.

Step 2. Download eyeos 2.5 from https://sourceforge.net/projects/eyeos25opensour/

Step 3.
Extract eyeos 2.5 zip file in htdocs folder in c://xampp/htdocs folder

Step 4. Open
XAMPP control panel application

Step 5.
Start apache and mysql Server

Step 6. Open
following link in browser, localhost/eyeos/install ad then click on
“Install eyeOS 2 on my server

Step 7. Then eyeos requirements page would be displayed.

Step 8. The
user would need to enable short_open_tag. Do this by changing off to on in
php.ini file present at xampp\php location.

Step 9.
the user also need to enable extension=php_curl.Dll by removing
semicolon from front of it in same php.Ini file

Step 10.
Then click on “continue with the installation”

Step 11.
Create database eyeos in phpMyAdmin

Step 12. In
eyeos 2 configuration page enter username as root and password as 123.

Step 13. “eyeos 2 has
been installed” page would be displayed and then click on “go to my new
eyeos !”

Step 14. Login site
of eyeos is, localhost/eyeos/index.Php

Logging in
The first
you have to do to use eyeOS is to type the address of your server in your
browser's address bar. You will be then in an eyeOS Login Screen. (see
Illustration 1).

If you have
already an account in this server, just type your Username and Password and
press “Enter” to log into your Desktop. Please proceed to the chapter 2 “The
Desktop: First Steps”.
If you do
not have yet an eyeOS account for this server, and the server administrator
allows new users (so the “New User” text appears in the bottom left part of the
Login Box), you can create a new user. Please proceed to chapter 1.2
“Creating a new user”.
Creating
a new user
To create a
new user, press “New User” and fill the form with your desired Username and
Password. Note that the username must have at least 4 characters, and that you
have to introduce your password twice to ensure that you have not typed it
wrong. Once you have filled the username and the password, click on “Create
account”.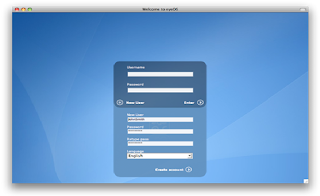

Illustration
2: Creating a new user
If
everything was OK (and a message saying that your user has been created
successfully appears), you can log in now using the Login Box, introducing the
Username and Password you have just chosen while creating your user.
Comments
Post a Comment